Showing posts with label recipe. Show all posts

Wednesday, March 23, 2011

Sick Day Hot Toddy


I haven't been sick enough to miss work since coming down with norovirus in 2006. Since easing myself onto a natural, organic diet some years ago, I've not been sick at all, and I have to admit I've taken a smug pride in the fact that I never get sick.

Pride goeth before the fall.

I write this near 7 pm on a Wednesday, after spending the entire day in bed - and a shame too, it looked like such a pretty day out. When I realized I was in no shape to go to work, due to this debilitating chest cold I picked up (after, mind you, eating processed foods at work again), I thought I'd get some writing done and maybe straighten up the house. HA. I haven't been able to stay vertical for more than five minutes at a time, and I've spent the vast majority of the day sleeping.

It's working though. I'm still not feeling great, but I feel a bit better than I did this morning. So I thought I'd share the best chest-cold remedy I know: the spiced brandy toddy. It'll help you get better in a hurry, and without a lot of scary drugs with all their side effects. Take one before you go to bed and you'll feel a little better, so you can go to sleep and let your body do the work of healing.

SICK DAY BRANDY TODDY

½ a fresh lemon
1 oz brandy, bourbon, or rum
1 Tbsp raw apple cider vinegar
1 Tbsp raw honey
½ tsp cinnamon
¼ tsp cayenne pepper
Simmering water

Squeeze all the juice out of the lemon half into a large mug. Drop a chunk of the rind in, if you like. Add the liquor, ACV, honey, cinnamon, and pepper. Top off with simmering water and stir until honey is melted and contents are evenly blended. Sip immediately while it's still quite hot.

Here's why it works:

The hot water soothes your throat, and also helps to raise your body temperature so your immune system doesn't have to work as hard to kill the infection. (Remember that we get fevers because heat kills off certain infections.) It's also psychologically soothing.

Honey coats your throat a bit, easing the pain and raspy feeling. It's also a powerful antimicrobial - you can treat minor eye infections with raw honey - which also helps to fight the infection. And it sweetens the taste of the other flavors, which might not be so enjoyable together otherwise.

Lemon is loaded with vitamin C, which we all know is a powerful immune-booster. The acid in the lemon juice and ACV also works to break up phlegm and clear your throat.

You can skip the raw apple cider vinegar if you really want, but its health benefits are many and it really does work. If you don't want to drink it, you can put some on a cotton ball and rub it on your chest, under your nose, and on your forehead. It works a bit like Vick's, but in my opinion it smells better and it's better for you. It doesn't taste bad in the toddy, either - it blends right in with the lemon.

Cinnamon tastes nice too, and it also has antimicrobial properties. The cayenne can also be skipped, but its flavor is unobtrusive and it helps if you're having sinus problems; we all know how spice can clear your head. I also find that a bit of cayenne helps to numb a sore throat.

And that brandy/bourbon/rum? It's soothing and helps you go to sleep, so that your body can work harder on fighting off the infection. If you don't buy it, remember that alcohol is also a key ingredient in NyQuil - but a nice hot toddy tastes a lot better.

And now I'm going back to bed. Wish someone was here to bring me some chicken soup.

Monday, March 7, 2011

Blackeyed Peas, Demystified


The back page of each issue of Organic Gardening magazine is given to an article by the magazine's editor, Maria Rodale. Her grandfather J. I. Rodale is widely considered to be the founder of the modern organic gardening movement; gardening and produce are still, after publishing, the family business. Presumably, Maria grew up around a wide variety of vegetables. So I was stunned to read this article, in which she described a vacation to a B&B near Nashville, where she was treated to "something they called peas." These weird little beans didn't resemble any peas she'd ever heard of, so she inquired and got an education on field peas - including the most famous of field peas, the symbol of the South, the blackeyed pea.

The article reminded me of a time two years ago when a friend from New York was visiting us and checked out the pantry as I made dinner. "What's this?" she asked, picking up a jar. "These funny little beans with the spot that looks like an A?"

Until then, I'd assumed that blackeyed peas were on a level with cornbread and ham. Sure, they're Southern, but everyone knows about them, right? Wrong, it turns out! I mentioned them on Twitter not too long ago when someone asked about a healthy standard weeknight supper, and I was asked repeatedly to explain blackeyed peas and how to cook them.

So here it is. Blackeyed peas are pretty hard to screw up, but with a rich, smoky molasses they can be so much more delicious than their humble nature implies. They're packed with protein, calcium, folate, and vitamin A, among other benefits. They're dirt-cheap and store for a very long time, so you can stock up and always have plenty on hand. They bring you luck when eaten on New Year's Day. They don't even need to be pre-soaked. And don't be fooled by Southern stereotypes - blackeyed peas do NOT need pork, or even any meat at all.

And the best part: They're at their best when left alone in a crockpot all day while you go to work. For an easy and nutritious weeknight supper, throw blackeyed peas in the crockpot before you leave in the morning, and then whip up a quick honey cornbread (here's my recipe) when you get home. Collard greens and copper pennies, as in the pic above, are nice but optional!

MOLASSES BLACKEYED PEAS

1 cup dried blackeye peas
4 cups chicken/vegetable broth, water, or a combo
2 cloves minced garlic
¼ cup molasses
2 Tbsp balsamic vinegar or cider vinegar
1 Tbsp toasted sesame oil (see note)
1 tsp salt
1 tsp hot sauce
½ tsp crushed red pepper
½ tsp dried savory or parsley (optional)
¼ tsp ground black pepper

Chopped green onion, to taste

Note: You can use olive oil, but if you have toasted sesame oil, definitely use it here.

Rinse off the blackeyed peas in a strainer. If you see any shriveled-looking or darkened peas (or little pebbles, sometimes it happens), toss them.

Combine everything but the green onion in the crockpot and switch it on. The measurements don't need to be exact. Forget about it for 8-10 hours. Come home and give it a stir, and when the cornbread is ready, dish up those peas and sprinkle green onion on top.

If you're not making any other dishes and this is just a simple blackeyed-peas-and-cornbread dinner, try a pickle and/or some sliced radishes on the side. Raw veggies really sing with this, or sometimes I go the other way and have a few cubes of cheese. Just keep it simple!

Friday, February 25, 2011

Can't Help Falling in Love


Wise men say
Only fools rush in,
But I can't help...


...licking every last crumb off the plate after sampling this Elvis Pie.

No kidding, y'all, this is hands down the best pie I've ever made in my life. And I completely made it up as I went along (thankfully I wrote it down as I went, so I can duplicate it later). Charcutepalooza is changing my entire outlook on food here; I've never been a huge meat eater (I was a strict vegetarian for 12 years, from age 11-23) and I've never liked pork, but I cannot get enough of this homemade bacon.

I have a friend here in Portland who is also not too big on meat, but she and I have been experimenting with old-school meat production the way some people (ahem, certainly not us) have experimented with recreational drugs. Last summer we slaughtered five unfortunate chickens who'd been hatched in my garage and raised in my backyard, where they also met their end. At Christmas she hesitantly volunteered to try my maple bacon cream pie (look up to your right at the Kickstarter link, there's a picture); she loved it.

So when I was making my own bacon for Charcutepalooza, she was interested, and her husband owned a little meat smoker. So I borrowed their smoker with the promise of sharing the bacon once it was finished. I did bring them some bacon tonight, but they let me keep the smoker awhile longer, so to thank them I took the opportunity to try out an idea I'd been kicking around for awhile: Elvis Pie.


The only thing it needs is a bit more bacon. Otherwise, it's perfect. I was inspired by the sandwiches that famously killed the King - peanut butter, banana, and bacon, sandwiched between slices of white bread and fried crisp in butter and bacon fat. According to legend, Elvis ate two of these every night. Sure explains how this...


...becomes this.


So just don't eat two of these a day. You still gotta splurge sometimes!

For this pie, I made a graham cracker crust with vanilla sugar, butter, and bacon fat (of course using the fat from cooking my homemade bacon, cured in maple and brown sugar with a touch of cloves). Then I layered in a peanut butter cream filling sweetened with brown sugar and honey. I topped that with a layer of fresh sliced bananas - here's where I'll also add more bacon when I make this again - and then I poured a lovely vanilla custard over it all and let it chill until firm.

Just before serving, I whipped cream with confectioner's sugar, vanilla, and a little more bacon fat. I spread that over the top, then sprinkled it with graham cracker crumbs, chopped chocolate, and finally... that beautiful thick-cut home-cured sweet bacon.


A pie fit for the King! But, except for the one slice I sampled here, I gave it to my friends. Because they're awesome, and because one thing I've learned about meat production and preservation is that it tends to be a community endeavor. And that's why it goes so well with pie.

Wednesday, February 23, 2011

Homemade Bacon, Homegrown Eggs: Carbonara as it was meant to be.


We ate this spaghetti squash alla carbonara two nights in a row, and would've had it again if we'd had more spaghetti squash. I'd call Charcutepalooza #2 a rousing success.

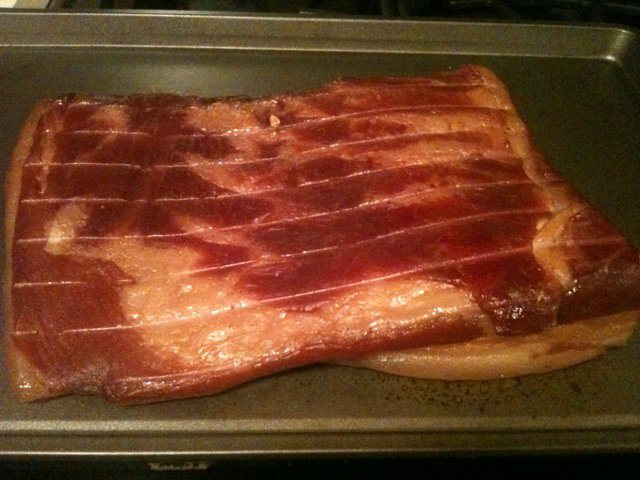
After curing sweet and savory bacon in the fridge for over a week, I borrowed a friend's smoker and some applewood chips, and fired the whole thing up in my garage since the day was drizzly (I left the garage door open, but it still smells like bacon in there). The cured pork belly sat in the smoker for four hours, at which point I moved it to a 200° F oven to finish off.

I noticed that before I smoked it, when I first removed the pork belly from the cure, it was kind of greyish and not that beautiful bacony pink. I was disappointed at first, but hoped that smoking would pink it up. Sure enough, when it came out of the smoker, I had this:


Michael Ruhlman, in his excellent book Charcuterie (which is the official textbook for Charcutepalooza), says to let the bacon cool to room temperature but adds, "Try a piece now though, straight out of the oven - it's irresistible." He's absolutely right. It was incredible. I shared a piece with Anne, my new roommate and half the genius of Fab Frugal Food, and we both had to stop ourselves from devouring the whole thing. While she ran out to buy a spaghetti squash, I found myself trimming the fatty skin off the bacon slabs while still hot, and chewing on that skin to suck out the warm, fresh bacon fat. So much for that Jewish Guilt.

That very night, we had to try using the bacon. So I put the maple-brown sugar bacon away for another use, and cut some of the savory bacon into lardons. Anne is currently on a grain-free diet, but I wanted to try a carbonara, so we went with a spaghetti squash recipe that Anne calls "low-carb-onara."


I can't find the recipe on Fab Frugal Food anymore to link to it, but I took some liberties with it anyway. I fried the lardons with a handful of garlic and some chopped fresh rosemary and thyme from the yard. Anne roasted the spaghetti squash and then raked it up with a fork until it perfectly resembled its namesake; it went into the pan with the bacon and garlic, while I whipped up three egg whites with one yolk, reserving the other two yolks on a plate. (We used one egg from each of my hens, now that all three are finally laying again.) I beat a ton of parmesan into the egg mixture, then tossed the squash and bacon with it, gave it plenty of pepper...

...and then we dished it up with pine nuts, fresh parsley, and a single yolk on top of each serving, mixing the raw yolk into the spaghetti squash to make a creamy sauce. Obviously I wouldn't recommend doing this with storebought eggs, but real carbonara is definitely a perk of raising my own chickens. I love this stuff. And with my homemade, flavorful, extra-tasty bacon cut thick into lardons... ohhhh my. Any word I could use in any tongue would be painfully inadequate.


So Teenage Jewish Vegetarian Kimberly can huff off to her room and slam the door all she wants. I plan to start another batch of bacon this week. I'm moving on to the next phase of Charcutepalooza too - look for homemade corned beef next month, mmm! - but I think homemade bacon is going to be a regular thing around our house. I've never put anything this delicious in my mouth before and I want it all the time.

As for the spaghetti squash, I liked it better than the usual pasta. It had more texture, and its mild flavor complemented the carbonara really well. It wasn't as slippery as pasta, so it held the sauce better, and its nutritional content was way higher than noodles would've been. Score another point for gluten-free!

And what about the maple-brown sugar bacon I made? I fried up a little last night just to taste it, and it's a sticky-sweet-salty concoction that just begs to be used in a pie. Maple Bacon Cream Pie, my specialty, seems obvious, but I feel like a taste of home. So tonight, it's Elvis Pie. A graham cracker crust with butter and bacon fat, with a creamy peanut butter layer on the bottom, topped with a lucious banana cream filling, then garnished with vanilla sweetened whipped cream and chunks of this sweet-salty bacon. I can't wait.

Monday, January 31, 2011

Charcutepalooza: Duck Prosciutto


I promise, I have had a lot going on besides Charcutepalooza. But dangit, Charcutepalooza is the fun one of all my current projects! And finally today we got to enjoy its benefits.

The duck prosciutto was ready last week, but we were busy and only had time to try a little nibble. Our duck breasts had quite a bit of fat on them, which wasn't so good to eat straight, but I learned I could trim it off and use it to give an amazing richness to a pot of beans. Beyond that, we wrapped up the duck prosciutto and stashed it in the freezer for a better day.

Today was that day, and I decided that if you can't have a fancy appetizer for breakfast sometimes, then you aren't really living. I've always seen pork prosciutto served in thin slices wrapped around chunks of melon... and I got to thinking that the sweeter acidity of a mango would go nicely with our juniper-cured duck prosciutto.

The great thing about having frozen the prosciutto: It was easier to slice it very thin. And by the time I had the mango peeled and cubed, those thin slivers of duck had thawed out. So I just wrapped them up and plonked them on a pretty dish, and we nibbled our mango-prosciutto bites with our fingers over the newspaper. I had coffee because I'm a junkie, but Keith had his with peppermint tea, and in retrospect I bet that was really lovely with the fruit and duck.

So that's project one of Charcutepalooza, and I still have plenty of home-cured duck prosciutto in the freezer. (I'm thinking I need to chunk some of it up in the spring and make a pasta dish with duck prosciutto and the first little green peas from my garden.) Next up is homemade bacon, and I was out pricing pork belly for that today.

It's funny how cooking expands your horizons. Five years ago, I was in Hollywood experimenting with new produce from the Sunday farmers' market at Sunset and Vine. Three years ago, I was new in Portland and beginning to try my Grandmother's old freezing rituals and planning my garden. Two years ago, my dabbling interest in canning took off into an ever-growing epic that now consumes my summers and allows me to go Christmas shopping in my own pantry. One year ago, I started making cheese. And now that I've nailed down the science and craft of freezing and canning, my preservation inclinations are coming to include charcuterie. Not bad for a former-vegetarian urbanite.

And I find the more I learn, the less I know, and I like it that way. This way I always get to keep on learning! Now, on to that pork belly...

Saturday, January 15, 2011

Crustless Quiche


I cleaned out the fridge the other day and had some leftovers to use up - a bunch of wilting chard, two little strips of salted duck meat that I had to trim off when making prosciutto, heels of cheeses, etc. My first thought was quiche (it usually is), but with health, weight loss, and time concerns, I didn't want to make a crust for it. Thank heaven for crustless quiche.

It's good for you, it's delicious, and it's one of the easiest things you can make (especially in the field of pie). You can clean out your fridge and throw in whatever you have; even leftover broccoli would work. If you don't have time to caramelize the onions and your meat is already cooked (or you aren't using meat), just throw in some green onions or shallots. Quiche is so flexible!

CLEAN-OUT-THE-FRIDGE CRUSTLESS QUICHE
serves 4

2 Tbsp butter, divided
1 Tbsp olive oil
½ small onion, finely chopped
½ cup meat of your choice, cut into small cubes (optional)
1 ¼ cup grated medium cheese (cheddar, gouda, mozzarella, etc.), divided
1 bunch spinach, chard, or kale (washed, dried, and chopped)
3 eggs
1 cup milk
2 Tbsp flour (wheat or gluten-free)
1 Tbsp chopped fresh rosemary (or 1 tsp dried)
1 Tbsp chopped fresh thyme (or 1 tsp dried)
½ tsp Dijon mustard (optional)
¼ tsp nutmeg
Salt and pepper to taste
2 Tbsp Parmesan cheese
1 tsp paprika

Coat the inside of a pie plate or 9-10" casserole dish with 1 Tbsp butter, then spread ¼ cup cheese over the bottom. Set aside. Preheat the oven to 400 F.

In a small skillet, melt the remaining butter with olive oil on medium heat. Add the onion and saute until it starts to soften. Add the meat and continue cooking about 5 minutes or until onions are light golden and beginning to caramelize, and meat is cooked. (If the meat's already cooked, wait until the onions are done and then just stir it in.)

Meanwhile, dump the greens into the food processor and pulse until finely chopped. Add the remaining 1 cup cheese, eggs, milk, flour, herbs, mustard, nutmeg, salt, and pepper. Pulse a few more times until everything is blended. Pour in the caramelized onions and meat, along with the butter and olive oil they cooked in, and give it a quick pulse or two just to stir. Pour into the prepared pie plate or casserole and spread out evenly. (It won't look very pretty. That's okay.)

Sprinkle the Parmesan and paprika over the top and bake for 30-40 minutes, or until a knife inserted in the center comes out clean. Cool for 10 minutes or so (while you whip up a salad to go with it, perhaps) and cut into wedges for serving.

Tuesday, December 21, 2010

Breakfast of Champions


Keith and I have both been GO-GO-GO for the last week, since we put off our holiday prep until the last minute, and now we're playing catch-up. One thing we have noticed is a tendency to get pretty tired if we don't eat balanced meals. This sounds like a no-brainer, but when you're baking and sampling and tasting stuff all day, you forget to eat real food and it all wreaks havoc on your blood sugar. So we've been trying to start each day off right with a balanced breakfast.

This breakfast is another of my favorites; I have it a lot when I'm home alone, though Keith likes it too. It feels like a fully-balanced meal, which it is, but it's simple to make and fits soothingly into a single bowl. It goes very nicely with coffee, and keeps me happy until lunchtime so I don't get any snack attacks. I call it the Breakfast of Champions because it really does make me feel all energized and healthy, and then I go on to a productive morning whenever I have it!

I'm not entirely sure, but I think I was inspired to come up with this recipe once when I was craving the cheese grits of my homeland; polenta, the yellow-corn version of hominy grits, is easier to come by in these parts, and it makes this recipe taste so gloriously Italian. If you don't see polenta or grits (NOT INSTANT! NEVER INSTANT!) in the store, then the coarsest cornmeal you can find will do.

And don't be put off by the directions - it looks like a lot of steps, but it comes together in the time it takes your partner to have a leisurely shower.

BREAKFAST OF CHAMPIONS
Serves 2

2 cups water or broth
½ cup polenta/grits/coarse-ground cornmeal
¼ cup crumbled bleu cheese or parmesan
½ Tbsp butter
¼ tsp salt
1 Tbsp olive oil
1 ½ cups chopped kale or spinach
1 Tbsp balsamic vinegar
2 Tbsp water
¼ cup spaghetti/pizza sauce
2 eggs
¼ cup pine nuts

Pour 2 cups water or broth into a medium-size pot and bring to a gentle boil. Once it simmers, whisk the polenta in with a fork. Cover, turn the heat down to low, and simmer for 5-10 minutes, stirring once or twice as it cooks. If it finishes before you're done with the rest of it all,

Meanwhile, heat 1 Tbsp olive oil in a skillet, and add the kale or spinach. Saute 1-2 minutes, then add the balsamic vinegar and 2 Tbsp water. Continue to cook until the greens are bright and wilted (this will just be a few seconds for spinach, but it'll be another minute or two for kale). Add the spaghetti sauce and continue to cook until heated through.

Transfer the kale mixture to a plate and rinse out the skillet, or get another skillet. Cook the eggs however you like them - I like mine scrambled, Keith likes his fried, and sometime I want to try this with a poached egg because I think that sauce effect would be nice in this dish. Set aside.

Stir the cheese, butter, and salt into the polenta until melted throughout. Divide evenly into bowls, then top each serving with an egg and half the kale-sauce mixture. Sprinkle with pine nuts and serve immediately with hot coffee or tea.

Tuesday, December 14, 2010

Beefy Pumpkin Stew


This is one of my winter favorites - we both just love it. It's hearty, very filling, warming, and delicious, and so easy! The crockpot does most of the work, and the spices make the whole house smell delicious by dinnertime.

BEEFY PUMPKIN STEW

1 small pumpkin or butternut squash (about a pound)
1 lb cubed stew beef *
1 medium-sized rutabaga or potato, cubed
1 medium-sized turnip, cubed
1 large carrot, sliced
¼ onion, diced
3 cloves garlic, minced
½ cup pearl barley
1 Tbsp Dijon mustard
1 heaping tsp cumin
1 tsp salt
½ tsp paprika or chipotle powder
¼ tsp black pepper
¼ tsp cinnamon
Hot sauce to taste
4 cups water or broth

* To make this vegan: Use mushrooms instead of beef.

Cut the pumpkin in half and scoop out the guts. Quarter each half and carefully cut the rind off until the whole pumpkin is peeled. This is the most labor-intensive part, but if you're slammed for time, they do sell pre-peeled chunks of butternut squash in the grocery store; it won't be quite as good as fresh, but it's still tasty. Dice the peeled pumpkin into 1" cubes and put them in the crockpot.

Add all the remaining ingredients to the crockpot. Turn it on low and cook 8-10 hours. As it nears the end of the cook time, give it a good stir and check the seasonings. Enjoy with hot yeast rolls or cornbread.

Saturday, December 11, 2010

Turkey-Leek Pie (with vegetarian option)


In the winter, I often make this vegetarian leek-artichoke pie with excellent results. Today I was craving it, and I had some leeks, but I didn't have any artichoke hearts. So I dug around in the fridge and improvised, taking the opportunity to use some of the huge gallon bag of turkey I had left over from Thanksgiving weekend (we froze most of it, but I had some I'd thawed this week). The result - even better than the original.

And with this crust, it's unbelieveably simple. You don't even have to roll the crust out or dirty up a bowl! It really is "easy as pie." Make it gluten-free with brown rice flour instead of wheat, if that's your thing.

To make it vegetarian, just leave out the turkey and throw in another cup of veggies - artichoke hearts are great, obviously, but so are potatoes or even beans. You could throw in some chunks of frozen tofu as well, and I was just thinking how good pine nuts would be. If you want to leave the egg out, just increase the milk to a full cup. This is a very flexible dish! And soooo comfort-foody. Just serve it with a salad for a delectable dinner.

TURKEY (OR VEGGIE) LEEK PIE
Serves 4-6

Crust:
1 cup whole wheat flour
½ cup unbleached white flour
1 Tbsp sugar
1 tsp salt
½ tsp pepper
¼ cup + 2 Tbsp milk
¼ cup olive oil

Preheat the oven to 375 F.

In a glass or metal pie plate, combine dry ingredients and whisk to blend. Add the milk and olive oil, then gently mix until it forms a dough. Use your hands to pat it into place over the bottom and sides of the pie plate. (A few tiny holes or rips are fine, just pinch them together if you can.) Set aside.

Filling:
1 Tbsp butter
4 cloves garlic, peeled and minced
1 large leek (or 2 smaller ones), white and light green parts, sliced & rinsed
1 cup kale (or spinach), rinsed and chopped
1 medium-sized turnip (or potato), diced small
1 cup cooked turkey (or chicken), diced
Salt & pepper to taste
Dash nutmeg
Fresh thyme (optional)
¾ cup milk
1 egg
2 Tbsp flour, any kind
½ cup crumbled gorgonzola cheese, divided

Melt the butter in a big saucepan or wok over medium-high heat, and add the garlic. Saute for a minute or two, then add the leeks, kale, and turnip. Stirring occasionally, cook until the leeks and kale begin to wilt. Season with salt, pepper, nutmeg, and thyme if using. Add turkey and cook another minute or two more.

Whisk the egg into the milk, then add the flour and whisk to blend. Pour into the pot with the veggies and turkey, and stir for a minute until warm throughout. Take it off the heat.

Spread all but 1 Tbsp of the gorgonzola into the bottom of the pie crust. Pour the veggie mixture on top and smooth it out evenly. Sprinkle the remaining 1 Tbsp gorgonzola crumbs on top and bake for 30-40 minutes or until set firm. Let stand at least 5-10 minutes before serving.

Note: If you're pressed for time after work, you can make the filling and crust a day ahead and refrigerate them separately; then just dump in the filling and cheese and throw it in the oven when you're ready.

Thursday, December 9, 2010

It's Thyme for Gorgonzola Latkes!


It's starting to feel, not just like December, but like the holiday season. It's the doing nice things for people and getting them back in return, accompanied by good food and wintry weather. Like today, for example.

Last night was the last night of Chanukah, so I had a couple of friends over for latkes. I had sweet potato latkes spiced with cumin, served with homemade applesauce and sour cream, with a spinach-tangerine salad on the side. We sipped amazing pear martinis and enjoyed warm, fresh-baked cranberry-apple pie with a ginger hazelnut crumble topping - a la mode, of course!

It was a lovely evening, and I baked an extra pie for the guy at the coffee shop, who's been a huge help as I sit there for hours every other day working on my business plan for my startup. This morning, I got an idea for gorgonzola latkes with fresh thyme, and I remembered him saying how much he liked latkes, so I whipped up a batch of the new recipe and plated them up with applesauce and sour cream. Miraculously, the latkes remained reasonably crisp and the pie held up as I walked the whole spread up to the coffee shop, where I was greeted with an enthusiastically appreciative reception and an enormous peppermint mocha.

Of course I ate a few of the gorgonzola-thyme latkes myself, and they're MIGHTY tasty. They might be my favorite latke recipe from now on. Try it yourself and see what you think - it doesn't have to be Chanukah for you to enjoy the miracle of oil!

THYME FOR GORGONZOLA LATKES
Serves 4

3 medium-sized Russet potatoes
½ a small onion
½ cup crumbled gorgonzola cheese
1 egg
1 sprig fresh thyme
3 Tbsp flour or matzo meal
1 tsp salt
1 tsp garlic powder (optional)
½ tsp paprika
½ tsp baking soda
Dash of black pepper
Peanut oil (or veg or canola) for frying

Peel the potatoes, dropping each one into a bowl of water as you finish peeling it to keep it from discoloring. Pat the potatoes dry and grate them with the coarse side of a box grater, or run them through the food processor - you want them very coarsely grated, not minced. Working quickly, pile the grated potatoes into a colander lined with a towel, and squeeze repeatedly until you get as much moisture out of the potatoes as you possibly can.

Transfer the dry grated potatoes to a large bowl, and grate in the onion. Stir in the gorgonzola, egg, and thyme leaves.

In a separate bowl, combine the matzo meal (which is MUCH better for this than flour), salt, garlic powder, paprika, baking soda, and pepper. Whisk so it's evenly blended, then add it to the potato mixture and mix well. Set aside so the matzo meal can soak up the remaining liquid while you heat the fry oil; turn the oven on to about 250 F.

Pour the oil into a heavy skillet, so the bottom is covered by a quarter-inch or so. Heat over high heat until a small piece of potato sizzles vigorously when you drop it in. Scoop up the latke mix between a spoon and your palm, about two tablespoons' worth, and roll it into a rough ball shape so it holds together; drop that into the oil and flatten it with the back of your spoon. (Make sure the middle is quite flat so the inside cooks through.) Fry for a few minutes until the sides start to look golden-brown, then flip to cook the other side, and drain on a plate lined with paper towels. Depending on the size of your skillet, you should be able to do 2-3 latkes at a time.

As you work, pop the drained latkes into a dish in the oven so they stay warm and crisp until you're ready to serve with sour cream and applesauce. A fruity saiad with a vinaigrette complements the latkes very nicely!

Tuesday, November 30, 2010

Quiche: Delicious and Nutritious, and Dairy-Free!


Here's me on the last day of the Naturally Frugal Challenge, squeaking in my big entry at the last minute. But I have a decent excuse, besides the business and travel I've been up to this month! See, the idea of the contest is to come up with an all-natural, in-season entree (no problem there) without using dairy (eeeeep!).

I knew my entry would have to be a pie of some kind. So of course I set myself the ultimate challenge - can I make quiche without milk, including soymilk or almond milk, which might count as processed foods?

My first attempt, while edible and not too bad, was not a winning contest entry. Simply leaving the milk out of the quiche doesn't work, since the milk is what fluffs up the eggs and produces that light, melt-in-your-mouth texture. What did work, on my last attempt, was separating the eggs and beating the whites separately. Air is even lighter than milk, and it will fluff your quiche beautifully with only one extra step!

Also in the first attempt, I tried to make the quiche gluten-free and wholegrain by making a crust out of brown rice and eggs. It was decent, and I could've made it work, but it made the whole dish a bit heavy on the egg front, and to be honest I like a nice pie crust under my quiche. I do make an excellent gluten-free pie crust (the recipe is at my other blog), which has butter, but this time I used my regular whole wheat crust and tried it with coconut oil. It worked beautifully. You use whichever homemade, whole wheat or gluten-free pie crust you like for this one.

The result of all this experimentation was the Ultimate Autumn Quiche. A variety of seasonal ingredients play off each other so that each bite is a unique experience; sometimes it's fruity, sometimes it's warm and toasty, sometimes it's complex and spicy. The ingredients may look sweet, and it does have a pumpkin pie texture to it, but the eggs, spices, nuts, and arugula just perfectly balance the cranberry and apple. I will definitely make this for company at the first opportunity!

THE ULTIMATE AUTUMN QUICHE

1 frozen homemade pie shell
1 cup pumpkin puree
3 eggs, separated
¼ cup natural or homemade applesauce, unsweetened
2 Tbsp nutritional yeast (optional)
1 Tbsp maple syrup
1 tsp Dijon mustard
½ tsp salt
½ tsp ginger
¼ tsp nutmeg
⅛ tsp paprika
1 cup arugula, chopped
½ cup dried cranberries
¼ coarsely-chopped hazelnuts or pecans
1 Tbsp finely-chopped hazelnuts or pecans

Preheat the oven to 400 F. Leave the pie shell in the freezer for now.

Combine the pumpkin, egg yolks, and applesauce in a large mixing bowl and whisk thoroughly to blend. Add the nutritional yeast - you don't have to use it if you can't find it, but it does add a nice cheesy dimension - as well as the maple syrup, mustard, and spices. Whisk again until it's all evenly blended.

One at a time, stir in the arugula, dried cranberries, and coarsely-chopped nuts. Set aside.

In a separate bowl, beat the egg whites until stiff peaks form. Gently fold into the pumpkin mixture. Retrieve the pie shell from the freezer and carefully pour in the filling; sprinkle the finely-chopped nuts over the top.

Bake at 400 F for 10 minutes, then turn the oven down to 350 F and continue baking another 25-30 minutes, or until a knife inserted into the center comes out clean. Let cool for at least 15 minutes before serving.

Suggestion: If you have to have meat in your entree, this is an excellent use for leftover Thanksgiving turkey. Just add ½ cup diced turkey when you add the arugula, cranberries, and nuts!

Monday, November 29, 2010

Spiced Pumpkin Oatmeal


This is not just a breakfast post; it's also an attempt to win a gorgeous set of holiday bakeware as part of the Naturally Frugal Challenge blog event!

After all the indulgence of Thanksgiving weekend, it was time for a healthy and nutritious breakfast. But it was also a lazy Sunday morning. We wanted something rich and delicious, and we didn't mind waiting half an hour for it. Enter steelcut oats.

But not just any oatmeal - this is fall, after all, when the fireplace crackles all morning and we watch the rain beating down the last of our garden. So it had to be a pumpkin oatmeal, warm and spicy with a nutritional boost from one of nature's healthiest veggies. Top it with some toasted nuts and dried fruit, and you have a decadent breakfast (or, what the hey, dinner!) that's actually good for you.

SPICED PUMPKIN OATMEAL
serves 4

4 cups water
2 Tbsp coconut oil (or butter)
1 cup steelcut oats
1 tsp cinnamon
1/2 tsp nutmeg
1/2 tsp ginger
1/4 tsp cloves
1/2 cup pumpkin puree
1/3 cup almond milk (or any milk)
Maple syrup to taste
Toppings of your choice (see note)

Heat the water in a kettle or pot until it boils.

Meanwhile, melt the coconut oil in a separate pot over medium heat, and stir in the oats. Toast the oats for a minute or so, then add the spices and continue to toast until it all smells warm and fragrant. Pour in 4 cups boiling water. Stir, cover, and turn the heat down to medium-low. Let it simmer 15 minutes.

Take the lid off and mix in the pumpkin until evenly blended in with the oats. Add the almond milk and continue cooking, uncovered, for another 5-10 minutes or until the oats are creamy and rich and excess liquid has cooked out. Serve it up in individual bowls and top with maple syrup, plus the toppings of your choice.

Topping Ideas: Dried cranberries, currants, or raisins; toasted nuts of any kind; all-natural or homemade applesauce; apple butter or pumpkin butter; a spoonful of jam; toasted coconut; fresh chopped apples or other fruit; candied ginger... use your imagination. And if you have a great topping idea, please share it in the comments!

Tuesday, November 23, 2010

Just in Time for Thanksgiving: Boozy Sweet Potatoes!


Stay tuned, y'all, apparently I'm in a generous mood because I'm sharing all my greatest hits this week.

My boozy sweet potatoes are probably my most popular recipe. I've been making them for every Thanksgiving, and almost every Christmas, for about ten years now and I've never had any leftovers the next day.

Don't worry about the name; the alcohol cooks out, but it leaves a strong flavor behind. What that flavor is, is up to you. I nearly always use rum, and occasionally spiced rum, but every once in awhile I substitute brandy instead and it's still good. I think I prefer the rum flavor, personally - it's stronger - but if you have brandy on hand, use it, because it's delicious.

BOOZY SWEET POTATOES

2 to 3 lbs sweet potatoes
½ cup maple syrup, brown sugar, or honey
2 eggs
⅓ cup milk
1 Tbsp vanilla
½ cup melted butter
⅓ cup dark rum or brandy
1 cup brown sugar
½ cup flour
⅓ cup melted butter
½ cup finely chopped nuts (optional)

Peel and chop sweet potatoes, and place into a large pot. Cover with water, bring to a boil, and simmer until sweet potatoes are soft enough to cut in half with a fork. Drain the sweet potatoes and transfer to a large mixing bowl.

Preheat the oven to 350 F.

Use an electric mixer or a potato masher to thoroughly mash the sweet potatoes until they're smooth. One at a time, mix in the maple syrup, eggs, milk, vanilla, ½ cup melted butter, and rum/brandy. Once thoroughly mixed, pour into a casserole dish (*see note).

In a separate bowl, mix brown sugar, flour, melted butter, and nuts if using. Using your fingers to break it up, sprinkle this mixture in small chunks over the top of the sweet potato mixture, covering the surface as much as possible. Bake for 30-45 minutes or until the streusel topping has browned into a soft crust. Let cool for at least half an hour before serving; it'll be best if you give it a few hours to come to room temperature.

Bring this one to a potluck - it travels really well!

*Note: You can use any size casserole dish here and it'll be fine. If you use a 9x13 or similarly large one, double the streusel topping. If you use a smaller one, the potatoes will be a little deeper and hence cook a bit longer, which is fine. It's really hard to screw this one up.

Happy Thanksgiving to all of you!

Perfect Pot Roast


Inspired by a friend the other day who was having trouble producing a pot roast, I decided to treat Keith and his dad to one of my own, setting a challenge for myself in the process. See, the easiest way to make a pot roast - BY FAR - is in the crockpot. Slow-simmering at low heat keeps the moisture with the meat, preventing it from drying out as it often does in the oven.

But here in Redondo, we don't have a crockpot. So I had to take a leap and see if I could produce a moist, juicy roast in a dry heat. I am pleased to report that it was a resounding success; Keith proclaimed it the best roast he'd ever had, and I can't say I disagree. So here's the tricks I figured out.

First: The meat. Chuck roast is best - and, fortuitously, cheapest. You actually want a fatty cut here. Don't use nasty cheap feedlot beef, of course, but since you're paying the higher price for organic/grassfed, take some comfort in the fact that you're getting the cheapest cut of it. The tougher meat and chunks of fat are going to break down together in the oven and make that succulent, tender pot roast you've been daydreaming about.

Second: You need a TIGHT seal. Use the smallest container that will fit the roast, which means a small casserole dish and not a huge roasting pan for your 3- or 4-lb. roast. Then, just before you pop it in the oven, fold a sheet of foil in half and cover the top of the dish before you put the lid on. This makes a tighter seal and keeps the steam from escaping from around the lid.

Third: Let it rest, still sealed, for half an hour when you pull it out of the oven. This allows the steamy goodness to settle back down into the meat, rather than poufing out in a huge cloud when you take the lid off.

And now for the recipe.

PERFECT POT ROAST

3 or 4 lb chuck roast
1/2 tsp salt (no more!)
Fresh-ground pepper to taste
Garlic powder and/or onion powder to taste
Worchestershire Sauce
Hot sauce of your choice (I had Cholula)
1 Tbsp organic canola oil
2 sprigs fresh rosemary
1 bottle of GOOD beer
2 Tbsp flour (white or whole wheat, doesn't matter)
2 Tbsp butter or olive oil

Preheat the oven to 325 F.

Sprinkle the seasonings all over the meat and rub them in. Be generous with the Worchestershire, liberal with the hot sauce; whatever your tastebuds can handle. Meanwhile heat the oil in a heavy skillet until it's quite hot, then sear the meat for two or three minutes on each side.

Remove the meat to your casserole dish. Tuck the rosemary in with it, pour what's left in the skillet over it, then open up the beer and pour it in until it almost, but not quite, reaches the top of the meat. (You should have just a little beer left over to drink.)

I can't stress enough how important it is to use a decent beer - this is NOT the time for Bud or Coors or whatever you might drink while watching the game. Break out something darker. Last night I happened to have Sam Adams Cherry-Wheat Ale, which was just okay for drinking but the sweetness really brought a lot out of the beef. Better beer would obviously be better.

Cover the casserole dish with the foil and then the lid like we talked about before. Leave it in the oven for about an hour per pound of meat (cutting it short by 15 minutes or so is fine if you're rushed). Take it out of the oven and set aside, without removing the lid, for 30 minutes. Then transfer the meat to a plate and strain the juices into a measuring cup or bowl with a pour spout.

Heat a skillet to medium and toss in the flour. Give it a minute or two to toast a bit, and then add the butter or olive oil, whisking with a fork or whisk until it makes a smooth paste. Splash in a bit of the strained juices, whisk smooth, then add the rest of the juices in a steady stream while whisking continuously. Bring to a boil, stirring occasionally, until it thickens - this will only take a minute or two. Serve the gravy with the pot roast and your favorite mashed potatoes, with a salad or green veg on the side.


And just because I gotta gloat: This is the dessert we had after the pot roast dinner last night. It's an experiment I've been kicking around for awhile, maple-bacon cream pie, and I have finally declared it a smash hit. The pie is filled with a smooth, delicious maple cream and topped with chopped bacon, which has been candied in maple and brown sugar. The sweet-salty-smokey flavors all play so nicely off each other, and it was the perfect ending for this dinner in particular - especially since we had it with port!

Sunday, November 21, 2010

Outta' Town Banana Muffins


(Apologies for the pic - I had coffee on the brain at 5:30 a.m.)


'Tis the season for holiday travel! We got a jump on the season yesterday, when Keith got a quick job in L.A. and I decided to join him just to get out of town for a couple of days. So yesterday we hit the road about 5:45 a.m. and hauled our exhausted selves into Redondo Beach just after 11 p.m. Of course there was a nasty weather system which drifted south along with us, so we spent most of the day wrestling rain, snow, and high winds, and just for good measure another storm blew into Redondo in the wee hours of the morning, waking us up with a chilly bath from the window.

But it's sunny now, and we're well-rested, and we're also well-nourished. We do this road trip thing fairly regularly, and I'm a seasoned road tripper in my own right, having crossed two continents all by my lonesome on several occasions. So I've learned a lot about travel, especially the fact that there is precious little to eat out there by the highway.

Oh sure, there's a fast food joint at every exit, and the gas stations are loaded with candy and chips. But c'mon, when you're spending an entire day with one eye on that swerving semi and the other on that cop in the rearview, you need FOOD. Something that's not going to drop you into a bloated coma ten minutes after you eat it; something that's not going to gas your travel companions out of the car. And even if you're flying (though I can't imagine why you would nowadays), you still need inexpensive fortification to get you through the journey in good health and cheer.

So pack a bag. Yesterday on our trip, I brought some cashews, cheese, sliced carrots and kohlrabi, two refillable water bottles, and a batch of these rich, moist banana muffins. I think I can safely say I'll be bringing these muffins on every trip from now on. They're the perfect road snack - easy to eat one-handed, a little sweet but not sugary, with whole grains to keep you full longer than a sugared white-flour muffin would, a dose of protein from nuts and eggs, and a rich soft texture that makes them feel like a treat. They travel well and don't dry out (actually, they get more moist as they sit).

Bring them on your next road trip, flight, train trip, or walk around the neighborhood. Don't forget the coffee.

OUTTA' TOWN BANANA MUFFINS

2 large bananas, very ripe (soft spots okay!)
1/2 cup pure maple syrup or honey
1/4 cup applesauce
2 eggs
1 Tbsp vanilla
3/4 cup whole wheat flour
1/2 cup rolled oats
1/4 cup flax meal
1/4 cup ground nuts or nut flour* (see note)
1 tsp cinnamon
1/2 tsp nutmeg
2 tsp baking powder
1 tsp baking soda
1/2 tsp salt
1/2 cup dried cranberries, blueberries, strawberries, or raisins

* Note: You can buy almond flour, hazelnut flour, etc. But it's a lot cheaper to just get whatever nuts you like (pecans are cheap) and grind them yourself; they don't have to be as finely ground as a flour, a coarser grind is just fine. Just toss them into the blender or food processor for a minute.

Preheat the oven to 350 F and line a 12-cup muffin tin with paper liners.

Break up the bananas and toss them in the food processor or blender. Add the maple syrup (or honey), applesauce, eggs, and vanilla; whiz it all up until smooth (a few banana chunks are fine).

In a separate bowl, combine the dry ingredients except for the fruit, and whisk together with a fork until evenly blended. Pour in the wet mixture and stir gently, just until blended - don't overmix. Fold in the dried fruit and spoon into the muffin cups, filling to the top. Bake for 25 minutes or until done. Leave them in the pan to cool on a wire rack, then wrap individually or just throw them all into one gallon-size bag like I did.

These last for a few days outside the fridge, and can also be frozen for later.

Safe travels!

Thursday, November 18, 2010

Biscuits (Gravy Optional)


I've probably mentioned before that Keith and I have a biscuit tradition. Whenever he goes out of town for work, his first morning home again means biscuits and gravy. This has given me plenty of opportunity to perfect my biscuit technique, and I don't mind saying that I make the best biscuits we've ever had.

The gravy varies a bit, but the biscuits don't; once you've perfected a recipe like this one, you don't need to mess with it anymore. Today I had the chanterelle mushroom duxelles that I made on Monday, so I stirred them into my usual and made mushroom gravy. And then, upon discovering that I've never actually shared my recipe here, I decided to go ahead and gift it over.

There are some tricks to perfect biscuits. The big one is the frozen butter - when I first made biscuits I couldn't get that lovely flaky texture until I decided to treat biscuit dough like pie crust, and it worked. Lumps of frozen butter go into the oven solid and then melt as the biscuits bake, creating air pockets and that gorgeous flaky melt-in-your-mouth goodness.

The other trick is to place the biscuits quite close together on the baking sheet or in the pan. This will keep them from spreading outward, and they'll shoot upward instead, getting thick and fluffy like this:


BUTTER BISCUITS
Makes 4-6 biscuits, depending on size.

3/4 cup warm water
1 1/2 tsp sugar
1 heaping tsp yeast
2 cups unbleached white flour
3 tsp baking powder
1 tsp salt
5 Tbsp frozen butter, divided

Pour warm water (not hot) into a small bowl and add the sugar and yeast. Whisk it up with a fork until the yeast is mostly dissolved, then set in a warm place (such as on top of the stove with the burners off).

In a separate mixing bowl, blend the flour, baking powder, and salt. Set aside 1 Tbsp of the butter; take the remaining 4 Tbsp and grate it into the bowl with a cheese grater. Use your hand to gently mix the butter into the flour mixture until it's evenly distributed but the butter is still solid and chunky.

By now, the yeast water should have a thick bubbly layer on top. Pour that into the flour-butter mixture, then gently stir it in until the dough gets too thick to stir. Knead it with your hands until it's even and all the flour has been worked in; at first it'll look like too much flour, but as you knead it, the whole thing comes together. Don't knead it for too long, just until the dough holds together and looks even throughout.

Sprinkle a little flour on the counter and run a floured hand over your rolling pin, then roll out the dough to about an inch thick. Cut circles with the top of a glass and put them close together in a cake pan or on a cookie sheet lined with parchment. Roll the scraps together and cut until you only have enough dough left for one biscuit, and then shape that one with your hands. They don't have to look perfect - uneven is okay. (If you have little bits of scraps left over, and you know anyone with chickens, they LOVE biscuit dough.)

Preheat the oven to 450 F and set the biscuit pan on top of the unlit stove. Let the biscuits rest and rise for about 15-20 minutes. It won't look like they're rising much, so don't worry if yours don't double in size like bread does. Just give them the time and then pop them in the oven for 10-12 minutes, until they're golden in color.

Melt the remaining 1 Tbsp butter and brush it over the biscuit tops as soon as they come out of the oven. Serve immediately while they're still hot. Top them with any gravy you like, or go the other way and drizzle them with honey, or spread them with jam. They'll make a great little breakfast sandwich - go all out and stuff a biscuit with fried chicken and honey for a decadent treat!

Monday, November 15, 2010

Wild Foraging: Chanterelles

Yay, today I'm writing for TWO blogs! This is also a guest-post on my friend's urban foraging blog, First Ways. I follow her blog avidly even though I'm not much of a forager yet - I eat the dandelions out of my yard, but I still have no idea where to find burdock or watercress in Portland, even though I know they're growing wild around here. One day I will take her class and learn. In the meantime, I'm here to crow about my very first wild foraging expedition!


That's me there, yesterday morning just after dawn, soaked with heavy rain out in the woods, bagging up chanterelle mushrooms. They're going for a relatively cheap $10 a pound at the farmers' market nowadays - I've seen them for two or three times that - so it's worth a good hike to go pick them yourself if you know where to find them. I didn't, but we have a friend who does.

If you know any mushroom hunters, or if you've read Michael Pollan's book The Omnivore's Dilemma, then you know that mushroom hunters will go to any length to avoid telling anyone where their spots are. It can be incredibly frustrating for the novice mushroomer, to beg and plead for a lesson only to have someone politely change the subject. This time I got a promise back in the summer, when I first floated the idea of killing and eating our seven excess chicks; friends offered to take us mushroom hunting in exchange for chicken processing experience and two of the chickens.

So chanterelle season rolled around, time for us to collect on their promise. Everyone was busy with one thing or another, so it was only yesterday and quite late in the season when we all drove out to an undisclosed location in the woods (hey, I swore I wouldn't tell). We left well before dawn, and there was only just enough light to see through the hard drizzle when we parked the car. We set off with bags and buckets for a relatively easy hike, a few miles down a smooth trail, and then there was the first chanterelle - just sitting there, growing right next to the road.

As we went deeper into the woods, we found them everywhere! They seem to favor the places close to tree stumps and live trees, without too much undergrowth (other spots were carpeted in ferns, and there were no chanterelles there). We found most of them in the wetter spots - yes, even in the same forest, one spot can be considerably wetter than a spot just a few feet away - and they didn't hide underneath logs and such the way that some other mushrooms do. There'd be dark brown leaf litter and the yellow-orange mushroom standing bold against it.

I understood pretty soon why mushroomers guard their spots so jealously; the mushrooms make so little attempt to hide themselves that there would be none left for anyone if the word got out where they were.

By the end of the day, our experienced guide had scored just over ten pounds, and Keith and I had bagged about half that. Had it been earlier in the season, we would've gotten plenty more, but I'm thrilled with what we got! We had a wonderful time tromping around in the woods, and so far we're enjoying ourselves just as much eating these delicacies in our warm dry house. A couple of them even found their way into our scrambled eggs this morning.

But I spent the afternoon turning the bulk of them into duxelles. This is a lovely way to preserve mushrooms of any kind; the French use it to stuff meats and vegetables or to spread on omelettes, and the British use it for Beef Wellington. I now have a pint and a half of luxurious chanterelle duxelles, which I intend to stir into risottos and which will probably find its way into the cornbread stuffing and the gravy this Thanksgiving. (And now I'm all on fire to make a Beef Wellington too.)

Go get your own delicious mushrooms - chanterelles are the best but use whatever edible ones you have available - and make up a batch of duxelles. It'll give a rich boost of earthy flavor to almost anything. Here's my recipe, adapted from Well Preserved by Eugenia Bone.

MUSHROOM DUXELLES

3 Tablespoons good olive oil
3/4 cup minced onion
2 lbs mushrooms, best available, washed & finely minced
1 sprig fresh thyme (optional)
1/4 cup chardonnay
1/4 cup dry vermouth
1 heaping tsp salt
1/2 tsp fresh-ground black pepper

Get down your biggest, heaviest skillet and heat 1 Tbsp olive oil in it. Add 1/3 the mushrooms and onions and saute; the mushrooms will let out a good deal of liquid, so keep cooking until the liquid evaporates. Transfer to a clean bowl, add another 1 Tbsp olive oil and half the remaining onion and mushrooms. Saute until the liquid evaporates, transfer to the bowl, then repeat with the remaining olive oil, onion, and mushrooms. When the last batch is cooked through, put the first two batches back in the skillet.

Add the whole sprig of thyme and all the other ingredients. Simmer, stirring occasionally, until the mushrooms have absorbed all the liquid; they should be a thick chunky paste by now. Fish out the thyme sprig and discard.

Spoon the duxelles into clean jars and refrigerate or freeze. You can also spoon it into ice cube trays and freeze into small servings, which can be added to gravy, pasta, eggs, etc. or just heated to thaw and spread on toast. If you want to save the duxelles in the fridge for more than a day or two, pack it densely into the jar with as few air pockets as possible, then cover it with olive oil and seal. The oil on top will keep it fresher for longer.

Friday, November 5, 2010

Incredible Autumn Risotto

When I'm feeling contemplative or morose, or when I just need some "me-time," I make risotto. There's something about that peaceful stirring and watching, ladling and absorbing, that makes the kitchen experience very zen for me. Risotto has an undeserved reputation for being difficult and time-consuming. It isn't! It does require your rapt attention, but only for 30-40 minutes, and that time can be a peaceful respite from whatever's going on.

And at the end, you have the ultimate comfort food.

This one I made last night was particularly incredible, loaded with apples, chanterelle mushrooms, turkey bacon, and gorgonzola cheese. The different flavors played off each other so well, and gave the dish a variety of textures to offset the lovely creaminess we all love in a risotto.

I failed to get a picture because Keith and I devoured it as soon as it was ready. Oh well, risotto isn't all that photogenic anyway. But it sure is delicious! I offer this recipe now in case anyone else needs a few minutes of kitchen P&Q and a warm autumn comfort dish.

INCREDIBLE AUTUMN RISOTTO
(serves 2-4, depending on your side dishes)

2 strips turkey bacon (or pork, if that's your thing)
4 cups good-quality chicken or vegetable broth
3 Tbsp butter, divided
1/4 cup minced onion
1/4 cup finely-sliced mushrooms* (about 1.5-2 oz, see note)
1 cup apple, peeled and finely diced
1 cup arborio rice
1/3 cup white wine
Scant 1/4 cup gorgonzola or bleu cheese
1/4 tsp nutmeg
Salt to taste

*Note: Use the best mushrooms you can get. I got a good deal on chanterelles, which are normally pretty expensive but you only need a couple ounces so you can splurge. If you can't get a few chanterelles, then go for shiitakes or baby bellas, just don't use the cheap white ones - and for the love of G-d, don't use canned! Good mushrooms will really make a difference here.

Fry the bacon in a deep, heavy dry skillet until mostly cooked on both sides. While it's frying, add broth to a medium-sized saucepan and bring it to a low boil. Once it's boiling, cover it and lower the heat so it stays at a nice low simmer.

When the bacon is done, drain it and wipe out the skillet if necessary (it won't be necessary with turkey, it will be with pork). Chop the bacon into little pieces and set aside.

Turn the heat under the skillet to medium-low and melt 2 Tbsp butter in it; add the onion and saute until the onion begins to soften. Add the bacon and mushrooms, and continue to saute for another minute or two, until the mushrooms soften a little; add the apple and the rice, and saute another minute or two. Pour in the wine and stir until the wine is mostly absorbed.

Now we get into that peaceful risotto action. Ladle in about a half-cup of the simmering broth (I use a soup ladle), then stir slowly until the rice absorbs it. Ladle in another half-cup of broth, and stir until it's absorbed. Continue in this fashion until you're out of broth; this will take about half an hour. Pour yourself a glass of the white wine you just used and sip it while you stand and stir. Play a little music. Think about life. Enjoy your peace.

When you're out of broth, the rice should be cooked through and your risotto should look nice and creamy. If you still need to cook a little more, use water or more white wine (a half-cup at a time, just like the broth) until the rice is done.

When it's ready, add the remaining tablespoon of butter, the grated or crumbled cheese, a little salt, and the nutmeg. Stir until it's all melted and blended together, then serve immediately. You'll probably want a light salad or a little something green to go on the side, so hopefully you already made it, or had someone else make it.

Enjoy your bliss, preferably with some fuzzy socks and a crackling fire.

Thursday, October 7, 2010

Strawberry Harvest, Round 2


Strawberries are pretty much done this season, I know. But if you haven't already, it's not too late to harvest the leaves!

You can start picking strawberry leaves in the spring and throughout the summer; the younger, tender leaves have the best flavor. But if you're like me and you forgot or didn't know, you can still get a harvest in before the frost kills off the plants. Just take some scissors out to the garden and clip off just the leaves. Make sure to leave some behind so the plant can sustain itself - don't pick it bare! - and don't take the leaves with mold or spots on them. Of course it goes without saying that you should not be harvesting leaves that've been sprayed with pesticides, chemical fertilizers, or other poisons.

Once you've got a bowlful, bring 'em inside. Run a few inches of cool water in the sink, and rinse the leaves carefully, using your fingers to go over each one and remove all the dirt, grit, little bugs, etc. Once they're all clean, you can use them right away or dry them for winter. To dry them, either spread them out in your dehydrator or spread them in a dark, dry place with plenty of circulation. Once dried, store them in a Ziploc baggie in the pantry or somewhere dark. Make sure they are fully dried. Fresh is okay and fully dried is okay, but when only partially dried, the leaves are toxic!

To use the strawberry leaves, make a tea. You can put a tablespoon of the dried leaves (or a bunch of fresh leaves) into a cup and top it off with boiling water, letting it steep for 15-20 minutes. Or, for maximum health benefits, put one tablespoon dried leaves per cup of boiling water in a jar, and let it steep overnight. You can drink this cold the next day, or reheat it if you like. A bit of raw honey boosts the health value and also makes it a little sweeter.

So why do you want to do this? Well, strawberry leaf tea is pretty tasty. But it's also packed to the gills with vitamins and minerals, including vitamin C, iron, and calcium - making it an ideal tonic for just about everyone, especially pregnant women and nursing mamas (for the latter, it's also said to boost milk production). It soothes the digestive system and works as an excellent natural remedy for indigestion and diarrhea, and some use it as a mild remedy for arthritis and eczema.

Flu season is right around the corner, which means that anything packed with vitamin C is a good idea to boost your immune system. Once it freezes here, I'll be harvesting rosehips and drying citrus peels too, for even more powerful C-food.

Isn't it cool how nature gives you what you need, right when you need it?

Tuesday, July 27, 2010

Epic Taco Salad


Keith came home from his trip last night, just in time for dinner. He'd asked for taco salad. So I went all-out and made the most epic taco salad ever. It was fabulous!

EPIC TACO SALAD

Dressing:
Juice of 1 lime
1 Tbsp balsamic vinegar
1/4 cup fresh parsley, finely chopped (use cilantro if you like it)
1 Tbsp chili powder
1 tsp smoked paprika
1/2 tsp cumin
1/2 tsp salt
1/4 tsp black pepper
Tiny pinch of sugar
1/2 cup olive oil

Meat Mix:
1 Tbsp olive oil
1/2 a small sweet onion, diced
5 or 6 baby bella mushrooms, sliced
1 fresh hot chile pepper, minced
1 Tbsp chile powder
1/2 Tbsp cumin
1 tsp chipotle powder
1 lb ground chicken (or beef)
1 (8 oz) can tomato sauce
Salt & pepper to taste

Salad:
1/2 Tbsp butter or olive oil
1 ear of corn, kernels cut off the cob
1 cup black beans (see note)
Salad greens, rinsed and dried
Cherry tomatoes, halved
Avocado, sliced
Carrot, shredded into curls with a peeler
Freshly-grated cheddar cheese
Pumpkin seeds

Tortilla chips (see note)

Note: You can use canned black beans, but I soaked and cooked dry beans in boiling water with salt, dried savory, and hot sauce. They were so much more flavorful than canned beans! And they required no active time; they just simmered while I did other stuff around the house. On the tortilla chips, you can use packaged ones, but I cut corn tortillas into eight little triangles each and fried them up in a mixture of peanut oil and schmaltz, then sprinkled them with salt as they drained. They were perfect for scooping up bites of salad!

For the dressing, whisk together everything but the oil in a small bowl. Steadily whisking, add the oil in a thin stream until blended. Refrigerate for 30 minutes to a day to let the flavors blend.

For the meat, heat the oil in a heavy skillet. Toss in the onion, mushrooms, hot pepper, and spices; saute for a couple of minutes until the onion starts to soften. Add the ground meat and keep cooking until it's mostly cooked through. Stir in the tomato sauce, season to taste with salt and pepper, and continue to cook until the meat is done and has soaked up the sauce. Transfer to a bowl and rinse out the skillet (it doesn't have to be perfectly clean, just rinsed and wiped out).

Melt the 1/2 Tbsp butter or oil in the skillet, then add the corn kernels. Saute for a minute or two and then remove from the heat. (Sure, you could use canned corn here, but the fresh corn is so delicious this time of year!)

Loosely chop the salad greens and put them in a pretty glass serving bowl. Top them with the meat mixture, then the corn, then the beans, tomatoes, avocado, carrot curls, cheese, and pumpkin seeds. Set this in the fridge for up to an hour, until you're ready to serve dinner.

When you're ready to eat, give the dressing another good whisking and drizzle about half of it over the top. Save the rest for another salad on another day. Serve the salad with tortilla chips on the side.

We had ours with homemade peach ice cream for dessert, and a nicely chilled rose. Perfect for a hot summer evening!